
如何使用Google開源模型SpeciesNet
2025, Mar 26
在 AI 技術持續突破的今天,Google 推出了令人興奮的開源模型 SpeciesNet,專為辨識野生動物而設計。這個模型訓練於數千萬張由相機偵測拍攝的實際照片,能夠自動識別超過 2000 種動物物種與相關標籤。對於從事生態研究、環境保護或開發自然觀察應用的開發者來說,SpeciesNet 提供了一個強大的工具,可大量減少人工標記的時間。
模型組合架構(Ensemble)
該系統包含兩個 AI 模型,分別負責不同任務:
1. MegaDetector(目標偵測器)
- 用途:從影像中找出 動物、人類、車輛 等目標。
- 特點:不辨識動物的種類,僅提供「有動物」這類粗略判斷。
- 適合用於初步過濾與目標區域偵測。
2. SpeciesNet(物種分類器)
- 架構:採用 Google 訓練的 EfficientNet V2 M 架構。
- 分類能力:可辨識超過 2000 個標籤,包含:
- 各種動物物種(例如:獅子、長頸鹿)
- 高階分類群(如:哺乳類 Mammalia、貓科 Felidae)
- 非動物類別(如:「空白」、「車輛」)
- 訓練資料:
- 來自 Wildlife Insights 社群的整理影像
- 公開資料庫,總數超過 6,500 萬張相機陷阱影像
- 功能:提供物種層級的影像分類結果。
整合方式
- 使用啟發式規則(heuristics)整合 MegaDetector 和 SpeciesNet 的輸出。
- 可選擇使用地理資訊以提升分類準確性。
- 最終為每張影像提供 單一分類結果。
這篇文章是紀錄實際應用 & 自己筆記用
安裝Python環境
-
安裝 Miniforge
-
安裝完成後開啟 Miniforge Prompt
- 輸入以下指令建立環境名稱:speciesnet
conda create -n speciesnet python=3.11 pip -y - 啟動speciesnet環境
conda activate speciesnet -
如出現以下代表環境建立成功
安裝SpeciesNet
pip install speciesnet
簡易測試
- 輸入以下指令執行預測
python -m speciesnet.scripts.run_model --folders "{需要辨識的圖片來源資料夾路徑}" --predictions_json "{輸出的json檔案}"

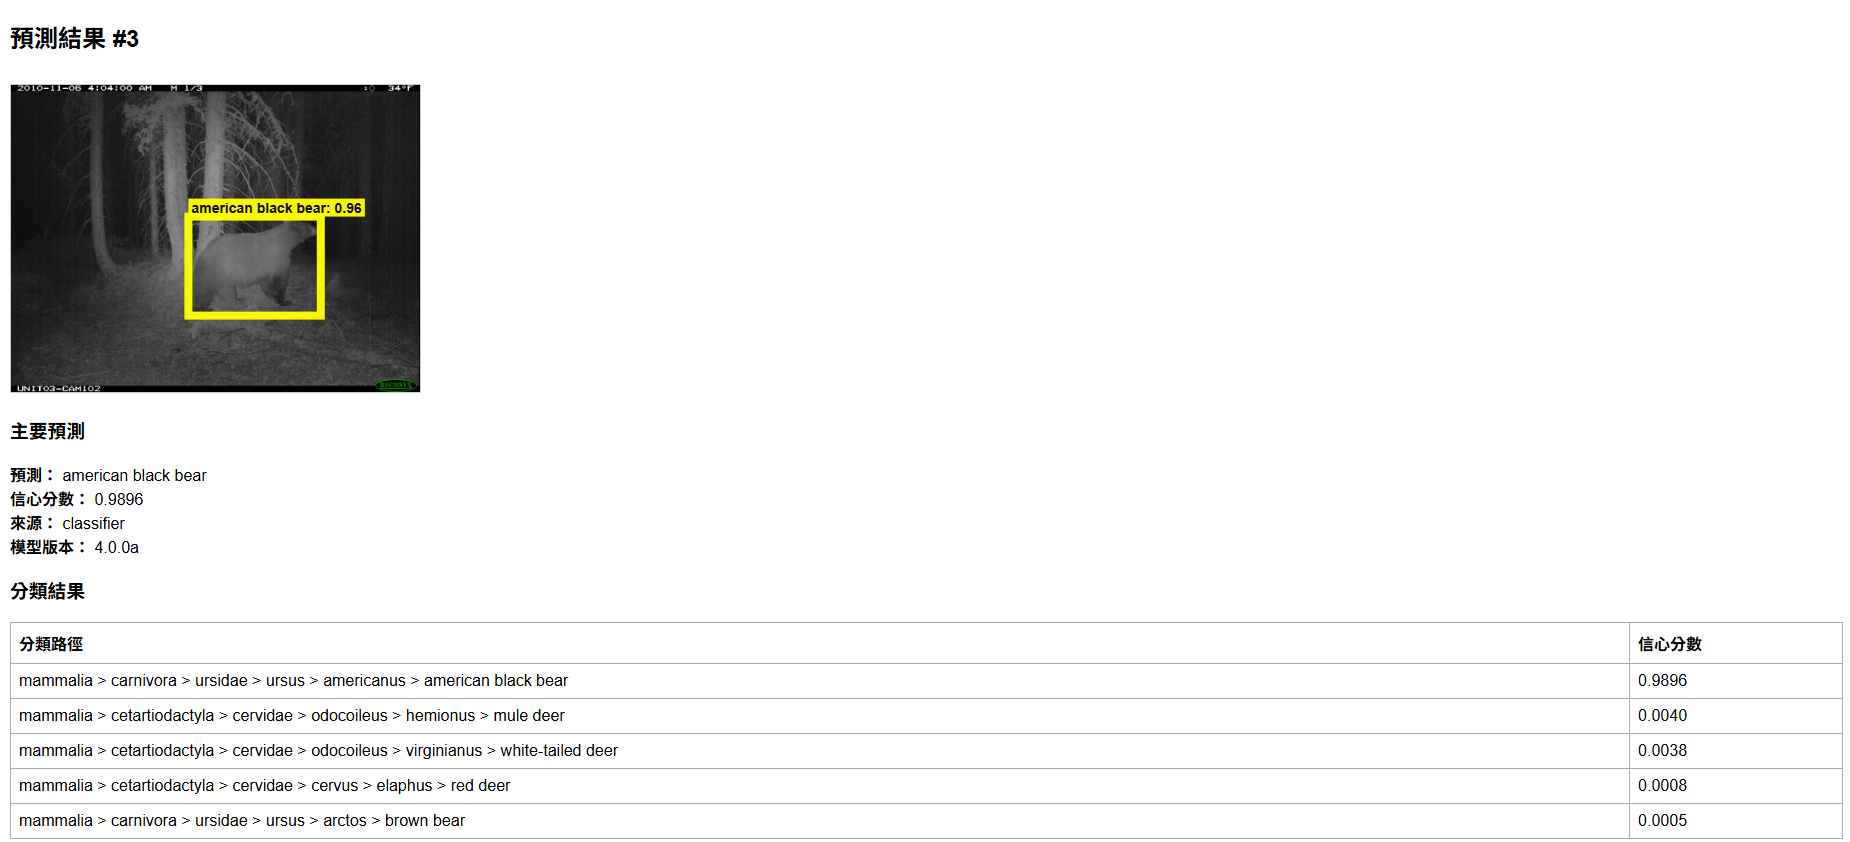
- 以某張圖為範例結果如下,把結果先丟給ChatGPT分析prediction區塊看來查看其含義
分類階層解析(從大到小)
| 分類層級 | 名稱 | 說明 |
|---|---|---|
| UUID | 436ddfdd-bc43-44c3-a25d-34671d3430a0 |
此筆分類資料的唯一識別碼 |
| 綱(Class) | mammalia |
哺乳綱,哺乳類動物 |
| 目(Order) | carnivora |
食肉目,例如狗、貓、熊、鼬等 |
| 科(Family) | ursidae |
熊科,包括棕熊、美洲黑熊等 |
| 屬(Genus) | ursus |
熊屬,包括灰熊、美洲黑熊 |
| 種(Species) | americanus |
Ursus americanus,美洲黑熊 |
| 常見名稱 | american black bear |
中文為「美洲黑熊」 |
Predictions:
{
    "predictions": [
                {
            "filepath": "image/american_black_bear.jpg",
            "classifications": {
                "classes": [
                    "436ddfdd-bc43-44c3-a25d-34671d3430a0;mammalia;carnivora;ursidae;ursus;americanus;american black bear",
                    "febff896-db40-4ac8-bcfe-5bb99a600950;mammalia;cetartiodactyla;cervidae;odocoileus;hemionus;mule deer",
                    "5c7ce479-8a45-40b3-ae21-7c97dfae22f5;mammalia;cetartiodactyla;cervidae;odocoileus;virginianus;white-tailed deer",
                    "eb3829b0-772e-4088-ae90-f11b9fe38284;mammalia;cetartiodactyla;cervidae;cervus;elaphus;red deer",
                    "330bb1e9-84d6-4e41-afa9-938aee17ea29;mammalia;carnivora;ursidae;ursus;arctos;brown bear"
                ],
                "scores": [
                    0.9895798563957214,
                    0.003979037050157785,
                    0.0037781514693051577,
                    0.0007601650431752205,
                    0.0005046064616180956
                ]
            },
            "detections": [
                {
                    "category": "1",
                    "label": "animal",
                    "conf": 0.9598512053489685,
                    "bbox": [
                        0.43310546875,
                        0.4283854365348816,
                        0.3232421875,
                        0.322265625
                    ]
                }
            ],
            "prediction": "436ddfdd-bc43-44c3-a25d-34671d3430a0;mammalia;carnivora;ursidae;ursus;americanus;american black bear",
            "prediction_score": 0.9895798563957214,
            "prediction_source": "classifier",
            "model_version": "4.0.0a"
        }
    ]
}
從json內可以看到有bbox(bounding box)標示出動物邊界框,我們以畫面帶出
微調模型
目前訓練程式碼尚未開源。雖然程式碼基本上是依照論文中的方法進行的,大部分的訓練資料也不是公開的
官方不久後可能會發布微調的範例程式碼
- 從kaggle下載模型至本地端查看模型結構
path = kagglehub.model_download("google/speciesnet/keras/v4.0.0a")

model_file = os.path.join(path, "always_crop_99710272_22x8_v12_epoch_00148.keras")

species_model = tf.keras.models.load_model(model_file)

species_model.summary()
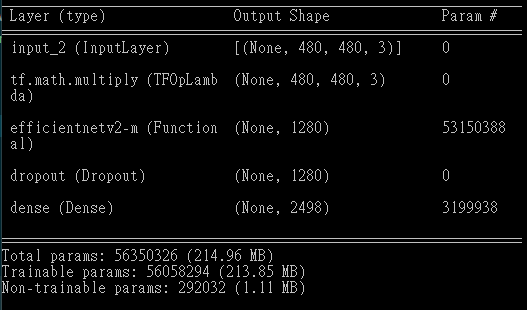
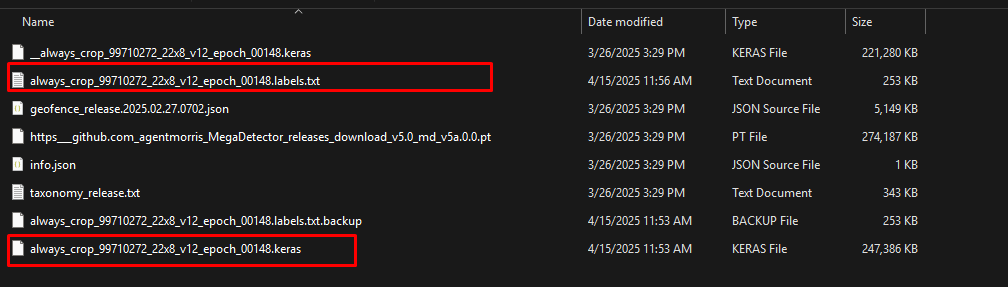
- 模型若有下載會放至
/root/.cache/kagglehub/models/google/speciesnet/keras/v4.0.0a/3- label 是標籤、keras是模型主檔
-
可試著微調模型加入台灣黑熊
 path = kagglehub.model_download("google/speciesnet/keras/v4.0.0a")

 model_file = os.path.join(path, "always_crop_99710272_22x8_v12_epoch_00148.keras")

 print(model_file);

 NEW_CLASS_NAME = "taiwan_black_bear"
 LABELS_TXT_PATH =  os.path.join(path, "always_crop_99710272_22x8_v12_epoch_00148.labels.txt")
 NEW_DATASET_DIR = "dataset/taiwan_black_bear"
 IMAGE_SIZE = (480, 480)
 BATCH_SIZE = 8
 EPOCHS = 10


 print("[INFO] Loading base model...")
 base_model = load_model(model_file)

 print("[INFO] Extracting old dense weights...")
 old_dense_layer = base_model.layers[-1]
 old_weights, old_bias = old_dense_layer.get_weights()

 original_class_count = old_weights.shape[1]
 new_class_count = original_class_count + 1

 print(f"[INFO] Expanding output layer from {original_class_count} to {new_class_count} classes...")

 new_weights = np.concatenate(
     [old_weights, np.random.normal(size=(old_weights.shape[0], 1))],
     axis=1
 )
 new_bias = np.concatenate(
     [old_bias, np.array([0.0])]
 )

 x = base_model.layers[-2].output  # Dropout 輸出層
 new_output = layers.Dense(new_class_count, activation='softmax', name="expanded_output")(x)

 model = Model(inputs=base_model.input, outputs=new_output)


 model.get_layer("expanded_output").set_weights([new_weights, new_bias])

 for layer in model.layers[:-1]:
     layer.trainable = False

 print("[INFO] Loading new class images...")
 datagen = ImageDataGenerator(rescale=1.0/255)

 def generate_bear_dataset(path):
     class_label = new_class_count - 1  # taiwan_black_bear = 2498
     filenames = [os.path.join(path, f) for f in os.listdir(path) if f.lower().endswith((".jpg", ".png"))]
     images = []
     labels = []
     for f in filenames:
         img = tf.keras.utils.load_img(f, target_size=IMAGE_SIZE)
         img_array = tf.keras.utils.img_to_array(img) / 255.0
         images.append(img_array)
         labels.append(class_label)
     return np.array(images), np.array(labels)

 X_train, y_train = generate_bear_dataset(NEW_DATASET_DIR)
 print(f"[INFO] Loaded {len(X_train)} images for class '{NEW_CLASS_NAME}'.")

 model.compile(optimizer=tf.keras.optimizers.Adam(1e-4),
             loss='sparse_categorical_crossentropy',
             metrics=['accuracy'])

 print("[INFO] Training on new class only...")
 model.fit(X_train, y_train, batch_size=BATCH_SIZE, epochs=EPOCHS)

 print("[INFO] Saving new model as 'speciesnet_with_bear.keras'...")
 model.save("speciesnet_with_bear.keras")

 new_uuid = str(uuid.uuid4())

 NEW_LABEL_LINE = f"{new_uuid};mammalia;carnivora;ursidae;ursus;thibetanus;taiwan_black_bear"

 with open(LABELS_TXT_PATH, "r", encoding="utf-8") as f:
     lines = f.readlines()
     if any("taiwan_black_bear" in line for line in lines):
         print("[INFO] Label for 'taiwan_black_bear' already exists in labels.txt, skipping append.")
     else:
         backup_path = LABELS_TXT_PATH + ".backup"
         if not os.path.exists(backup_path):
             with open(backup_path, "w", encoding="utf-8") as backup_file:
                 backup_file.writelines(lines)
             print(f"[INFO] Backup created: {backup_path}")

         with open(LABELS_TXT_PATH, "a", encoding="utf-8") as f_append:
             f_append.write("\n" + NEW_LABEL_LINE)
             print(f"[INFO] Appended new class to labels.txt: {new_uuid}")
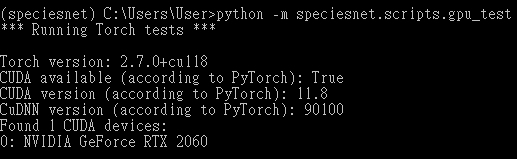
使用GPU (以Windows為例)
使用GPU可以加外模型預測處理速度,使用以下指令有檢測到GPU即可
pip install torch torchvision --upgrade --force-reinstall --index-url https://download.pytorch.org/whl/cu118
python -m speciesnet.scripts.gpu_test
演示用程式
參考資料
- https://github.com/google/cameratrapai?tab=readme-ov-file
- https://github.com/google/cameratrapai/blob/main/installing-python.md
- https://www.inside.com.tw/article/37737-google-opensources-speciesnet